django入门之模板的用法

1.为什么要使用模板?

看下以前的代码

1
2
3
4
5
6
7
#-*- coding:utf-8 -*-
from django.shortcuts import render
from django.http import HttpResponse
# Create your views here.

def index(request):
return HttpResponse(t.render("<h1>Hello,World!</h1>"))

这里是把页面以字符串的形式返回。如果页面有点多,页面内容有点多的话,就得返回写好的html网页了。

2. 使用写好的网页。

首先得引入django的模板加载器,代码如下:

1
from django.template import loader,Context

然后要创建一个加载器,和一个返回动态数据的Context对象,最后返回个模板。

1
2
3
4
def index(request):
t = loader.get_template("index.html")
c = Context({"title":"django模板添加动态数据"})
return HttpResponse(t.render(c))

3. 创建模板。然后在你的app文件夹下,也就是和你的views.py同级目录下新建个文件夹templates,并在templates文件夹下创建个html文件,这里叫index.html
4. 编辑模板。打开index.html,随意输入点html代码
1
2
3
4
5
<html>
<body>
<h1>Hello,django!</h1>
</body>
</html>

最后你可以运行服务器,在cmd中打开项目目录,输入命令:manage.py runserver 或者 python manage.py runserver,然后你会看到如下界面:

你可以打开你的浏览器,在导航栏中输入地址: http://127.0.0.1:8000/blog/indexblog是指你的应用名,我的是blog。然后你就可以看到你的index.html了。

5. 在模板里获取动态数据

打开index.html的编辑界面,在需要输出的地方加上{{需要输出的变量}}。比如我上面的代码里传入了title,在html里只要写{{title}}就行了

1
<title>Hello,{{title}}</title>

git基本命令

git基本命令

1
2
3
4
5
6
7
8
9
10
11
12
13
14
15
16
17
18
19
git status //查看当前git情况 参数-s
git init //git 初始化
git config --global user.name ''//设置用户名
git config --global user.email ''//设置email
git config --list //查看配置
git clone '仓库地址' //复制远程仓库到本地
git add file // 提交文件到临时仓库
git rm -cached '文件路径' 从临时仓库删除
git commit -m '描述内容' // 把临时仓库文件提交到本地仓库
git push -u origin master //提交到远程仓库
git pull origin master从远程仓库拉回来
git pull --rebase
git diff
git log
git reset --hard 哈希值的前六位//回滚到之前的版本
git branch v2 //添加一个分支v2
git branch gh-pages //添加个可以直接浏览的分支 //浏览地址 sorry510.github.io/仓库名
git checkout gh-pages
git push origin gh-pages

设置密码

1
git config --global user.password "xxxxxx(your password)"

设置远程仓库地址

1
2
3
4
5
git remote add origin https://sorry510:xp28344655@github.com/sorry510/cms
git remote -v 查看远程仓库地址
git remote set-url origin https://github.com/sorry510/cms 修改地址

git fetch origin php 更新远程上的php分支

提交到远程仓库设置权限
修改.git/config
remote “origin”]
url = https://github.com/sorry510/test.git
改为
remote “origin”]
url = https://用户名:密码@github.com/sorry510/test.git
例如//url = https://sorry510:xp28344655@github.com/sorry510/test.git

vi常用快捷键

正常模式
启动vim后默认位于正常模式。不论位于什么模式,按下键(有时需要按两下)
都会进入正常模式。
ctrl+r 撤销 +u
插入模式
在正常模式中按下i, I, a, A等键(后面系列文章会详细介绍),会进入插入模式。

命令模式
在正常模式中,按下:(冒号)键,会进入命令模式。
:w 保存文件但不退出vi
:w file 将修改另外保存到file中,不退出vi
:w! 强制保存,不推出vi
:wq 保存文件并退出vi
:wq! 强制保存文件,并退出vi
:q 不保存文件,退出vi
:q! 不保存文件,强制退出vi
:e! 放弃所有修改,从上次保存文件开始再编辑

:set nu 显示行数

可视模式
在正常模式按下v, V, +v,可以进入可视模式

1
2
3
4
5
6
ssh-keygen -t rsa -C "chen.jinlong@vmicloud.com"

① cd ~/.ssh/ 【如果没有对应的文件夹,则执行 mkdir ./.ssh】
② git config --global user.name "xb12369"
③ git config --global user.email "1234@qq.com"
④ ssh-keygen -t rsa -C "1234@qq.com"

合并分支

1
2
3
git merge --no-ff  分支

git checkout -b develop origin/develop

git工作流学习

git 的工作流程 纯干货
git workflow 工作流

1. 有一次线上项目出bug了,需要把master上的项目拉取到本地

1
2
git checkout master
git pull
然后在本地修改完bug,重新上传到master上
1
2
3
4
git add .
git commit -m '修改了bug'
git pull #看看有没有新的提交
git push #同步到远程仓库
然后把master上的修改的内容同步到开发分支上,以防下次bug再出现
1
2
git checkout feature    #先切换到feature分支(开发分支)
git merge master #把master分支合并到当前分支
修改完毕
1
2
3
4
5
#Git创建Develop分支的命令
git checkout -b develop master
#将Develop分支发布到Master分支的命令
git checkout master
git merge --no-ff develop

springboot 如何解决跨域问题

spring boot 如何解决跨域问题?
在spring config.java 里配置。如下:

1
2
3
4
5
6
7
8
9
10
11
12
13
14
15
16
17
18
19
@Configuration
public class SpringMvcConfig {
@Bean
public Filter corsFilter(){
UrlBasedCorsConfigurationSource source = new UrlBasedCorsConfigurationSource();
CorsConfiguration config = new CorsConfiguration();
config.addAllowedOrigin("*");
config.addAllowedHeader("*");
config.addAllowedMethod("OPTIONS");
config.addAllowedMethod("HEAD");
config.addAllowedMethod("GET");
config.addAllowedMethod("PUT");
config.addAllowedMethod("POST");
config.addAllowedMethod("DELETE");
config.addAllowedMethod("PATCH");
source.registerCorsConfiguration("/**", config);
return new CorsFilter(source);
}
}

@Configration 表示是系统配置。不用在xml文件中配置,项目可以自动执行配置代码

1
config.addAllowedOrigin("*");

这句话的意思是设置允许请求的域名。*代表所有的都允许。

only-child 用法 React click事件

今天遇到了一个需求:

案例列表有的会有两个图片,有的有一个图片。两个图片中间又要留出空隙。一般做法都是用js解决。而我的想法是能用css解决的,就不用js

我的思路是:only-child 处理有一个图片的情况。
nth-child(2) 处理有两个图片下的间距问题。代码如下:

1
2
3
4
5
6
7
8
9
10
11
12
#case-list .case-item .imgs img{
width: 300px;
height: 300px;
display: block;
float: left;
}
#case-list .case-item .imgs img:nth-child(2){
margin-left: 16px;
}
#case-list .case-item .imgs img:only-child{
width: 610px;
}

所有主流浏览器均支持 :only-child 选择器,除了 IE8 及更早的版本。

JQuery源码之自调用匿名函数


React 添加事件

1
2
3
4
5
6
7
8
9
10
11
12
13
14
15
16
17
18
19
20
21
22
23
24
25
26
27
28
29
30
31
32
33
34
35
36
37
38
39
40
41
42
43
44
45
_init_ = (function(window,undefined){
return {
getWidthOfClient:function(){
var width = document.body.clientWidth;
var container = document.getElementById("container");
//container.style.width = width + "px";
},
bindBannerClickHandeler(){
var pos_left = 0;
var Banner = React.createClass({
prevHandle:function(){
pos_left = -300;
},
render:function(){
return <div>
<img className="logo" src="img/logo.png" ></img>
<div className="img-list" style={{left:pos_left}}>
<div className="banner-box">
<img src="img/banner2.png"></img>
</div>

<div className="banner-box">
<img src="img/banner2.png"></img>
</div>

<div className="banner-box">
<img src="img/banner2.png"></img>
</div>

</div>

<div className="modal-box">
<div className="width-base height-max auto">
<span className="prev" onClick={this.prevHandle}></span>
<span className="next"></span>
</div>
</div>
</div>
}
});

ReactDOM.render(<Banner />,document.getElementById("banner"))
}
}
})(window)

一些JS骚操作

一、强制类型转换

1.1 string强制转换为数字
1
2
3
4
5
6
7
8
9
10
11
12
13
//可以用*1来转化为数字((实际上是调用.valueOf方法) 然后使用Number.isNaN来判断是否为NaN,或者使用 a !== a 来判断是否为NaN)
'32' * 1 // 32
'ds' * 1 // NaN
null * 1 // 0
undefined * 1 // NaN
1 * { valueOf: ()=>'3' } // 3
//使用+来转化字符串为数字
+ '123' // 123
+ 'ds' // NaN
+ '' // 0
+ null // 0
+ undefined // NaN
+ { valueOf: ()=>'3' } // 3
1.2 使用Boolean过滤数组中的所有假值
1
2
const compact = arr => arr.filter(Boolean)
compact([0, 1, false, 2, '', 3, 'a', 'e' * 23, NaN, 's', 34])
1.3 数值取整 –去除小数点后面的值
1
2
3
4
~~2.33
2.33 | 0
2.33 >> 0
//Math.floor()向下取整,值永远只会变小
1.4 判断奇偶数,负数同样适用
1
2
3
4
const num=3;
!!(num & 1) // true
!!(num % 2) // true
//以上两种形式返回true的都是奇数
JS|| && 妙用 多重if else 选择情况
1
2
3
4
5
6
7
8
9
10
11
12
13
14
15
16
17
18
19
20
21
22
23
24
25
26
27
28
29
30
31
32
33
34
35
36
37
38
39
40
41
42
43
44
45
46
/**
假设对成长速度显示规定如下:
成长速度为5显示1个箭头
成长速度为10显示2个箭头
成长速度为12显示3个箭头
成长速度为15显示4个箭头
其他显示为0个箭头
*/
//一般代码
var add_level = 0;
if(add_step == 5){
add_level = 1;
}
else if(add_step == 10){
add_level = 2;
}
else if(add_step == 12){
add_level = 3;
}
else if(add_step == 15){
add_level = 4;
}
else {
add_level = 0;
}

//好一点的switch
var add_level = 0;
switch(add_step){
case 5 : add_level = 1;
break;
case 10 : add_level = 2;
break;
case 12 : add_level = 3;
break;
case 15 : add_level = 4;
break;
default : add_level = 0;
break;
}

//更好一点的
var add_level = (add_step==5 && 1) || (add_step==10 && 2) || (add_step==12 && 3) || (add_step==15 && 4) || 0;

//还有更好的
var add_level={'5':1,'10':2,'12':3,'15':4}[add_step] || 0;

二、函数

2.1 惰性载入函数
1
2
3
4
5
6
7
8
9
10
11
12
13
14
15
16
17
18
19
20
21
22
//这个判断依据在整个项目运行期间一般不会变化,所以判断分支在整个项目运行期间只会运行某个特定分支,那么就可以考虑惰性载入函数
function foo(){
if(a !== b){
console.log('aaa')
}else{
console.log('bbb')
}
}

// 优化后
function foo(){
if(a != b){
foo = function(){
console.log('aaa')
}
}else{
foo = function(){
console.log('bbb')
}
}
return foo();
}
2.2 动态添加js
1
2
3
4
5
6
7
8
9
10
11
12
13
14
//动态添加js
document.write("<script src='" + context.path + "/resource/apps/logger.js'></script>");

/**
* 动态添加JS
* @param {Object} js
*/
function loadJs(js) {
var s = document.createElement('script');
s.setAttribute('type', 'text/javascript');
s.setAttribute('src', js);
var content = document.getElementById("container-fluid");
content.appendChild(s);
}

三、数组

3.1 reduce方法同时实现map和filter
1
2
3
4
5
6
7
8
9
10
11
12
13
const numbers = [10, 20, 30, 40];
const doubledOver50 = numbers.reduce((finalList, num,currentIndex,numbers) => {

console.log(finalList);
console.log(num);
console.log(currentIndex);
console.log(numbers);
num = num * 2;
if (num > 50) {
finalList.push(num);
}
return finalList;
}, []);
五种方法实现值交换
1
2
3
4
5
6
7
8
9
10

1. var temp = a; a = b; b = temp; //(传统,但需要借助临时变量)

2. a ^= b; b ^= a; a ^= b; //(需要两个整数)

3. b = [a, a = b][0] //(借助数组)

4. [a, b] = [b, a]; //(ES6,解构赋值)

5. a = a + b; b = a - b; a = a - b; //(小学奥赛题)
去掉小数部分
1
2
3
4
5
6
7
parseInt(num)

~~num

num >> 0

num | 0
判断x是否是整数
1
2
3
4
5
6
7
8
9
10
11
12

function isInt(x) {

return (x ^ 0) === x

}

// return Math.round(x) === x

// return (typeof x === 'number') && (x % 1 === 0)

// ES6 -> Number.isInteger()
数组去重
1
2
3
4
5
6
7
8
9
10
11
12
13
// ES6

Array.from(new Set(arr))


// ES5

arr.filter(function(ele, index, array){

return index===array.indexOf(ele)

})
数组最大值
1
2
3
4
5
function maxArr(arr) {

return Math.max.apply(null, arr)

}
数组最小值
1
2
3
4
5
function minArr(arr) {

return Math.min.apply(null, arr)

}
随机获取数组的一个成员
1
2
3
4
5
function randomOne(arr) {

return arr[Math.floor(Math.random() * arr.length)]

}
产生随机颜色
1
2
3
4
5
function getRandomColor() {

return `#${Math.random().toString(16).substr(2, 6)}`

}
随机生成指定长度字符串
1
2
3
4
5
6
7
8
9
10
function randomStr(n) {
let standard = 'abcdefghijklmnopqrstuvwxyz9876543210'
let len = standard.length
let result = ''

for (let i = 0; i < n; i++) {
result += standard.charAt(Math.floor(Math.random() * len))
}
return result
}
深拷贝
1
JSON.parse(JSON.stringify(obj))

#####

雅戈尔OA系统

工号:

1
2
3
4


# npm&yarn 换源&命令删除node_modules

1.查看当前源
npm
yarn config get registry
2、切换为淘宝源
yarn
npm config set registry https://registry.npm.taobao.org
3、或者切换为自带的
npm
yarn config set registry https://registry.yarnpkg.com
4、删除 node_modules
安装 rimraf
npm install rimraf -g
使用命令删除
rimraf node_modules

1
2
3
4


#### 本地排程号-工厂

西服:2019-J502
时装:2020-TX

1
2
3
4

liantong_0518

```home.vue

1
2
3
4
5
6
7
8
9
10
11
12
13
14
15
16
17
18
19
20
21
22
23
24
25
26
27
28
29
30
31
32
33
34
35
36
37
38
39
40
41
42
43
44
45
46
47
48
49
50
51
52
53
54
55
56
57
58
59
60
61
62
63
64
65
66
67
68
69
70
71
72
73
74
75
76
77
78
79
80
81
82
83
84
85
86
87
88
89
90
91
92
93
94
95
96
97
98
99
100
101
102
103
104
105
106
107
108
109
110
111
112
113
114
115
116
117
118
119
120
121
122
123
124
125
126
127
128
129
130
131
132
133
134
135
136
137
138
139
140
141
142
143
144
145
146
147
148
149
150
151
152
153
154
155
156
157
158
159
160
161
162
163
164
165
166
167
168
169
170
171
172
173
174
175
176
177
178
179
180
181
182
183
184
185
186
187
188
189
190
191
192
193
194
195
196
197
198
199
200
201
202
203
204
205
206
207
208
209
210
211
212
213
214
215
216
217
218
219
220
221
222
223
224
225
226
227
228
229
230
231
232
233
234
235
236
237
238
239
240
241
242
243
244
245
246
247
248
249
250
251
252
253
254
255
256
257
258
259
260
261
262
263
264
265
266
267
268
269
270
271
272
273
274
275
276
277
278
279
280
281
282
283
284
285
286
287
288
289
290
291
292
293
294
295
296
297
298
299
300
301
302
303
304
305
306
307
308
309
310
311
312
313
314
315
316
317
318
319
320
321
322
323
324
325
326
327
328
329
330
331
332
333
334
335
336
337
338
339
340
341
342
343
344
345
346
347
348
349
350
351
352
353
354
355
356
357
358
359
360
361
362
363
364
365
366
367
368
369
370
371
372
373
374
375
376
377
378
379
380
381
382
383
384
385
386
387
388
389
390
391
392
393
394
395
396
397
398
399
400
401
402
403
<template>
<div class="container">
<div class="screen-container">
<van-swipe-cell
v-for="(item, index) in screenList"
:disabled="!item.hasEnter"
:key="index">
<van-row
:class="`screenItem ${Number(screenIndex) === index ? 'screenActive' : ''}`"
@click="screenChange(item, index)"
>
<van-col class="content">
<p>{{ item.scrname }}</p>
<p>编号:{{ item.scrid }}</p>
<p v-if="item.createtime">创建时间:{{ item.createtime.slice(0,10) }}</p>
</van-col>
<van-col class="content">
<img :src="require(`@/assets/${item.scrid}.png`)" alt="">
</van-col>
</van-row>
<template #right>
<van-button square text="进入控制台" type="info" class="to-ctrl" @click="toControl(item), screenChange(item, index)"/>
</template>
</van-swipe-cell>
<!-- <div class="btn" @touchstart.prevent="startTouch" @touchend.prevent="touchEnd">测试语音</div> -->
</div>
<van-row class="posSelect" @click="selectShow()">切换地点</van-row>
<van-dialog
v-model="selectDialogShow"
@confirm="dialogConfirmHandler"
closeOnClickOverlay
:showConfirmButton="false"
title="请选择"
>
<div class="optionsWrap">
<div
:class="`posOption ${deviceCode==index+1 ? 'isActive' : ''}`"
v-for="(item, index) in screenPosList"
:key="index"
@click="screenSelect(index)"
>
{{ item.name }}
</div>
</div>
</van-dialog>
<!-- <Loading ref="loading" :visable="true"/> -->
</div>
</template>

<script>
import { Button, Tabbar, TabbarItem, Swipe, SwipeCell, SwipeItem, Row, Col, Dialog } from 'vant'
import * as dd from 'dingtalk-jsapi'
import { getScreenList, changeScreen, getTokenByAuthCode } from '../api/dingdingApi'
// import Loading from 'components/Loading'

export default {
name: 'home',
data () {
return {
selectDialogShow: false,
deviceCode: localStorage.getItem('DEVICE_CODE') || '1',
screenIndex: localStorage.getItem('SCREEN_INDEX') || 0,
// 大屏物理地点
screenPosList: [
{
name: 'A座大屏',
deviceCode: '1',
isActive: true
},
{
name: 'B座博物馆',
deviceCode: '2',
isActive: false
},
{
name: 'B座拼接屏',
deviceCode: '3',
isActive: false
}, {
name: '进入测试',
deviceCode: 100,
isActive: false
}
],
screenList: [
{
screenId: 1,
scrid: 1,
name: '设备互联调度中心',
num: '20200429090807',
time: '2020/4/29'
},
{
screenId: 2,
scrid: 2,
name: '产前调度中心',
num: '20200429090807',
time: '2020/4/29'
},
{
screenId: 3,
scrid: 3,
name: '车间订单调度中心',
num: '20200429090807',
time: '2020/4/29'
},
{
screenId: 4,
scrid: 4,
name: '智能产线调度中心',
num: '20200429090807',
time: '2020/4/29'
},
{
screenId: 5,
scrid: 5,
name: '生产通知调度大屏',
num: '20200429090807',
time: '2020/4/29'
},
{
screenId: 6,
scrid: 6,
name: '精益中心调度大屏',
num: '20200429090807',
time: '2020/4/29'
}
]
}
},
components: {
[Button.name]: Button,
[Tabbar.name]: Tabbar,
[TabbarItem.name]: TabbarItem,
[Swipe.name]: Swipe,
[SwipeItem.name]: SwipeItem,
[Row.name]: Row,
[Col.name]: Col,
[Dialog.Component.name]: Dialog.Component,
// Loading: Loading,
[SwipeCell.name]: SwipeCell
},
mounted () {
console.log(' --- 进入Home ---')

if (localStorage.getItem('FIRST_ENTER') === 'true' && localStorage.getItem('DEVICE_CODE') === null) {
this.selectDialogShow = true
} else {
this.selectDialogShow = false
try {
document.title = this.screenPosList[localStorage.getItem('DEVICE_CODE') - 1].name + '-控制器'
} catch (e) { console.error(e) }
}
console.log('deviceCode created:', localStorage.getItem('DEVICE_CODE'))
if (process.env.NODE_ENV === 'development') {
getScreenList().then(res => {
this.screenList = res.data
for (let item of this.screenList) {
item.imgUrl = 'p' + item.scrid
item.hasEnter = ![20200521001, 20200521004, 20200521005].includes(item.scrid)
}
const scrLoading = document.querySelector('#scr-loading')
setTimeout(() => {
scrLoading.className = 'fade-hide'
}, 500)
setTimeout(() => {
scrLoading.className = ''
scrLoading.style.display = 'none'
}, 1000)
})
}
debugger
console.log('--- 正在添加token ---')
try {
dd.runtime.permission.requestAuthCode({
corpId: 'ding93d89be042ee6abd35c2f4657eb6378f',
// corpId: 'ding9bf7f88c8bc0ced3ffe93478753d9884',
onSuccess: result => {
console.log(result)
console.log('添加token成功', result)
getTokenByAuthCode({
requestAuthCode: result.code
}).then(res => {
console.log('getTokenByAuthCode 成功', res)

localStorage.setItem('TOKEN', res.data)
getScreenList().then(res => {
this.screenList = res.data
for (let item of this.screenList) {
item.imgUrl = 'p' + item.scrid
}
}).catch(err => {
alert(JSON.stringify(err))
console.log('=========================>')

console.error(err)
})
}).catch(err => {
alert('getTokenByAuthCode 出错')
console.log('getTokenByAuthCode 出错', err)
})
/* {
code: 'hYLK98jkf0m' //string authCode
} */
},
onFail: err => {
console.log('添加token失败-->', err)
}

})
} catch (error) {
alert('添加token中途崩溃')
console.error('添加token中途崩溃')
console.error(error)
}
},
beforeRouteEnter (to, from, next) {
if (!from.name) {
localStorage.setItem('FIRST_ENTER', true)
} else {
localStorage.setItem('FIRST_ENTER', false)
}
next()
},
methods: {
// 大屏地点选择
screenSelect (index) {
console.log(typeof (index))
if (index === 3) {
this.$router.push('/test')
return
}
this.screenPosList.forEach(item => {
item.isActive = false
})
this.screenPosList[index].isActive = true
this.deviceCode = this.screenPosList[index].deviceCode
localStorage.setItem('DEVICE_CODE', this.deviceCode)
document.title = this.screenPosList[index].name + '-控制器'
dd.biz.navigation.setTitle({
title: document.title, // 控制标题文本,空字符串表示显示默认文本
onSuccess: function (result) {
console.log('设置title成功', result)
},
onFail: function (err) {
console.error('设置title失败', err)
}
})
this.selectDialogShow = false
},
dialogConfirmHandler () {
console.log('deviceCode:', this.deviceCode)
localStorage.setItem('DEVICE_CODE', this.deviceCode)
// this.selectDialogShow = true
},
// 切换地点按钮
selectShow () {
this.selectDialogShow = true
},
screenChange (item, index) {
this.screenIndex = index
localStorage.setItem('SCREEN_INDEX', this.screenIndex)
changeScreen({
deviceCode: this.deviceCode,
scrid: item.scrid
}).then(res => {
console.log(res)
})
},
toControl (item) {
this.$router.push({
path: '/control',
name: 'control',
query: {
name: item.scrname,
scrid: item.scrid,
deviceCode: this.deviceCode,
respower: item.respower
}
})
}
}
}
</script>
<style lang="scss" scoped>
.container{
height: auto;
width: 100%;
padding-bottom: 50px;
.screen-container {
height: 100%;
// background: red;
overflow: scroll;
.screenItem {
width: 90%;
height: 120px;
margin: 10px auto;
border: 1px solid rgba(136, 136, 136, 0.1);
// box-shadow: 3px 3px 5px rgba(136, 136, 136, 0.2);
padding: 20px 15px;
box-sizing: border-box;
.content {
height: 100%;
width: 50%;
position: relative;
.title {
position: absolute;
width: 120px;
height: 30px;
text-align: center;
line-height: 30px;
right: 0;
top: 15px;
background: rgba(82, 79, 79, 0.8);
font-size: 16px;
color: #fff;
}
}
.content:nth-child(1) {
text-align: left;
p {
margin: 0;
}
p:nth-child(1) {
color: #000;
font-size: 16px;
line-height: 22px;
margin-bottom: 4px;
// white-space: nowrap;
// text-overflow: ellipsis;
// overflow: hidden;
}
p:nth-child(n + 2) {
color: #9199A9!important;
font-size: 14px;
line-height: 20px;
}
}
.content:nth-child(2) {
text-align: right;
img {
width: 120px;
height: 60px;
background: #000;
border-radius: 4px;
}
}
}
.to-ctrl {
width: 80px;
height: 3.2rem;
line-height: 1.5;
}
.screenActive {
border-color: #3DD6F6;
background: url('../assets/icon_selected.png') bottom right no-repeat;
background-size: 10%;
border-radius: 3px;
}
}
// .btn{
// width: 300px;
// background: red;
// height: 100px;
// }
.posSelect {
width: 90%;
height: 40px;
background: #1487fb;
// border: 1px solid #1487fb;
border-radius: 20px;
position: fixed;
bottom: 15px;
left: 50%;
transform: translateX(-50%);
text-align: center;
line-height: 40px;
font-size: 16px;
color: #fff;
}
.optionsWrap {
width: 100%;
box-sizing: border-box;
padding: 10px 20px;
display: flex;
flex-wrap: wrap;
justify-content: space-between;
.posOption {
width: 80px;
padding: 5px 25px;
color: #9199A9;
text-align: center;
border-radius: 25px;
margin-bottom: 10px;
border: 1px solid transparent;
}
.isActive {
border-color: #1487fb;
color: #1487fb;
}
}
}
</style>
1
2
3
4
5
6
7
8
9
10
11
12
13
14
15
16
17
18
19
20
21
22
23
24
25
26
27
28
29
30
31
32
33
34
35
36
37
38
39
40
41
42
43
44
45
46
47
48
49
50
51
52
53
54
55
56
57
58
59
60
61
62
63
64
65
66
67
68
69
70
71
72
73
74
75
76
77
78
79
80
81
82
83
84
85
86
87
88
89
90
91
92
93
94
95
96
97
98
99
100
101
102
103
104
105
106
107
108
109
110
111
112
113
114
115
116
117
118
119
120
121
122
123
124
125
126
127
128
129
130
131
132
133
134
135
136
137
138
139
140
141
142
143
144
145
146
147
148
149
150
151
152
153
154
155
156
157
158
159
160
161
162
163
164
165
166
167
168
169
170
171
172
173
174
175
176
177
178
179
180
181
182
183
184
185
186
187
188
189
190
191
192
193
194
195
196
197
198
199

```javascript
const path = require('path')
const CompressionWebpackPlugin = require('compression-webpack-plugin')
const UglifyjsWebpackPlugin = require('uglifyjs-webpack-plugin')
const port = process.env.port || process.env.npm_config_port || 8888
const cdnDomian = './' // cdn域名,如果有cdn修改成对应的cdn
const name = '大屏控制器' // page title
const IS_PRODUCTION = process.env.NODE_ENV === 'production'
// dev环境接口地址
let DEVE_MODE_REQUEST_URL = 'http://localhost:8080/'
if (process.argv[4] === 'test') {
// test环境接口地址
DEVE_MODE_REQUEST_URL = 'http://101.71.158.252:8888/'
}
const cdn = {
css: [],
js: [
'https://cdn.bootcss.com/vue/2.6.10/vue.min.js',
'https://cdn.bootcss.com/vue-router/3.0.3/vue-router.min.js',
'https://cdn.bootcss.com/vuex/3.1.0/vuex.min.js',
'https://cdn.bootcss.com/axios/0.19.0-beta.1/axios.min.js',
'https://cdn.bootcss.com/js-cookie/2.2.1/js.cookie.min.js'
]
}

const externals = {
vue: 'Vue',
'vue-router': 'VueRouter',
vuex: 'Vuex',
axios: 'axios',
'js-cookie': 'Cookies'
}

function resolve (dir) {
return path.join(__dirname, dir)
}
console.log('process', process.argv[4])
module.exports = {
publicPath: IS_PRODUCTION ? cdnDomian : './',
outputDir: 'dist',
assetsDir: 'static',
lintOnSave: process.env.NODE_ENV === 'development',
productionSourceMap: false,
devServer: {
port: port,
open: true,
overlay: {
warnings: false,
errors: true
},
disableHostCheck: true,
proxy: {
'/sc_api': {
target: DEVE_MODE_REQUEST_URL,
changeOrigin: true
}
},
after: require('./mock/mock-server.js')
},
configureWebpack: {
// provide the app's title in webpack's name field, so that
// it can be accessed in index.html to inject the correct title.
name: name,
resolve: {
alias: {
'@': resolve('src'), // 主目录
'views': resolve('src/views'), // 页面
'components': resolve('src/components'), // 组件
'api': resolve('src/api'), // 接口
'utils': resolve('src/utils'), // 通用功能
'assets': resolve('src/assets'), // 静态资源
'style': resolve('src/style') // 通用样式
}
}
},
chainWebpack (config) {
config.plugins.delete('preload') // TODO: need test
config.plugins.delete('prefetch') // TODO: need test

// set svg-sprite-loader
config.module
.rule('svg')
.exclude.add(resolve('src/icons'))
.end()
config.module
.rule('icons')
.test(/\.svg$/)
.include.add(resolve('src/icons'))
.end()
.use('svg-sprite-loader')
.loader('svg-sprite-loader')
.options({
symbolId: 'icon-[name]'
})
.end()

// set preserveWhitespace
config.module
.rule('vue')
.use('vue-loader')
.loader('vue-loader')
.tap(options => {
options.compilerOptions.preserveWhitespace = true
return options
})
.end()

config
// https://webpack.js.org/configuration/devtool/#development
.when(process.env.NODE_ENV === 'development',
config => config.devtool('cheap-source-map')
)

config
.when(process.env.NODE_ENV !== 'development',
config => {
config
.plugin('ScriptExtHtmlWebpackPlugin')
.after('html')
.use('script-ext-html-webpack-plugin', [{
// `runtime` must same as runtimeChunk name. default is `runtime`
inline: /runtime\..*\.js$/
}])
.end()
config
.optimization.splitChunks({
chunks: 'all',
cacheGroups: {
libs: {
name: 'chunk-libs',
test: /[\\/]node_modules[\\/]/,
priority: 10,
chunks: 'initial' // only package third parties that are initially dependent
},
commons: {
name: 'chunk-commons',
test: resolve('src/components'), // can customize your rules
minChunks: 3, // minimum common number
priority: 5,
reuseExistingChunk: true
}
}
})
config.optimization.runtimeChunk('single')
}
)
if (IS_PRODUCTION) {
config.plugin('html').tap(args => {
args[0].cdn = cdn
return args
})
config.externals(externals)
config.plugin('html').tap(args => {
args[0].minify.minifyCSS = true // 压缩html中的css
return args
})
// gzip需要nginx进行配合
config
.plugin('compression')
.use(CompressionWebpackPlugin)
.tap(() => [
{
test: /\.js$|\.html$|\.css/, // 匹配文件名
threshold: 10240, // 超过10k进行压缩
deleteOriginalAssets: false // 是否删除源文件
}
])
config.optimization.minimizer([
new UglifyjsWebpackPlugin({
// 生产环境推荐关闭 sourcemap 防止源码泄漏
// 服务端通过前端发送的行列,根据 sourcemap 转为源文件位置
sourceMap: true,
uglifyOptions: {
warnings: false,
compress: {
drop_console: false,
drop_debugger: false
}
}
})
])
}
},
css: {
// 是否使用css分离插件 ExtractTextPlugin
extract: !!IS_PRODUCTION,
// 开启 CSS source maps?
sourceMap: false,
// css预设器配置项
// 启用 CSS modules for all css / pre-processor files.
modules: false,
loaderOptions: {
sass: {
data: '@import "style/_mixin.scss";@import "style/_variables.scss";@import "style/common.scss";' // 全局引入
}
}
}
}

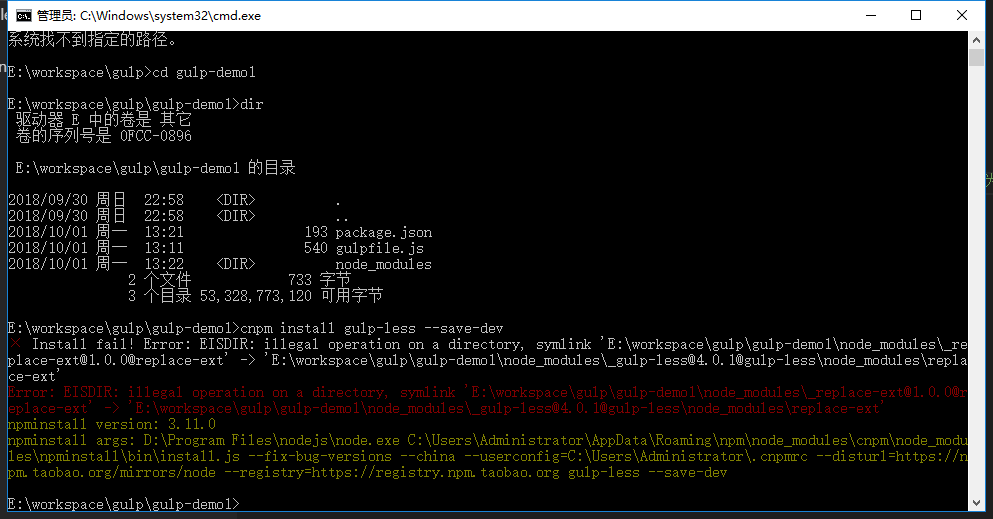
关于FAT32硬盘格式不支持cnpm的解决办法

最近学习gulp ,运行 cnpm install gulp-less --save -dev 的时候,报了如下错误:


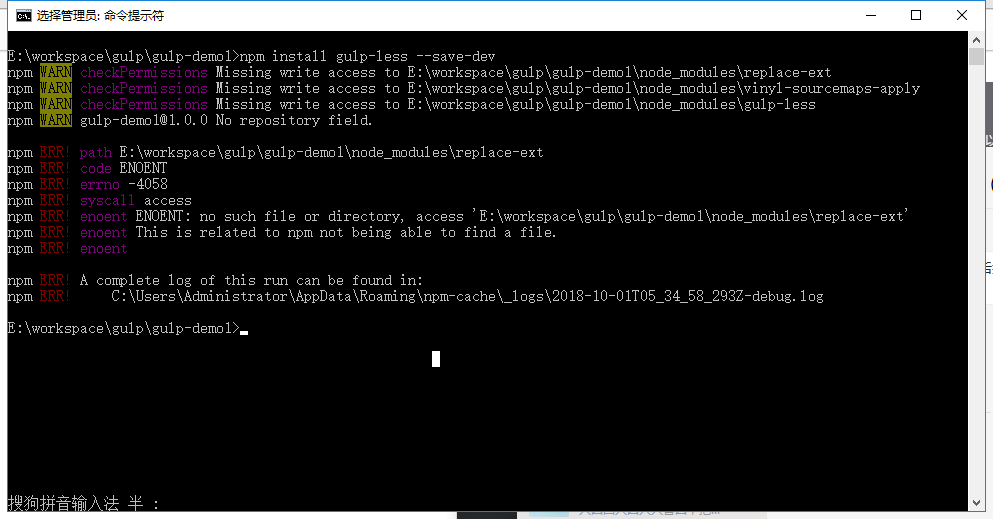
然后改用 npm 安装,结果如下:

这是因为硬盘格式是 FAT32 格式的。解决办法如下:

可以使用 npm 去解决:cnpm i --by=npm --no-bin-links
或者:npm i --registry=https://registry.npm.taobao.org --no-bin-links
在使用--no-bin-links时,注意Maximum call stack size exceeded的问题。

关于React 路由嵌套方式的其中一种

现在react router v4 的路由嵌套改成这样子了。和之前的大不一样。
不过也不是也别麻烦。
代码如下:

1
2
3
4
5
6
7
8
9
10
11
12
13
14
15
16
17
18
19
20
21
22
23
24
25
26
27
28
29
30
31
32
33
34
35
36
37
38
39
40
41
42
43
44
45
46
47
48
49
50
51
52
53
54
55
56
57
58
59
60
61
62
63
64
65
66
67
68
69
70
71
72
73
74
75
76
77
78
79
80
import React from 'react'
import {
BrowserRouter as Router,
Route,
Link
} from 'react-router-dom'

const BasicExample = () => (
<Router>
<div>
<ul>
<li><Link to="/">Home</Link></li>
<li><Link to="/about">About</Link></li>
<li><Link to="/topics">Topics</Link></li>
</ul>

<hr/>

<Route exact path="/" component={Home}/>
<Route path="/about" component={About}/>
<Route path="/topics" component={Topics}/>
</div>
</Router>
)

const Home = () => (
<div>
<h2>Home</h2>
</div>
)
const Bus =()=>(<h2>Bus</h2>);
const Car =({match})=>(<h2>Car {match.params.message}</h2>);
const About = ({match}) => (
<div>
<h2>About</h2>
<Link to={`${match.url}/car/123`}>Car</Link>
<Link to={`${match.url}/bus`}>Bus</Link>
<Route path={`${match.url}/car/:message`} component={Car} />
<Route path={`${match.url}/bus`} component={Bus} />
<Route exact path={match.url} component={()=>(<h2>请选择一辆车</h2>)} />

</div>
)

const Topics = ({ match }) => (
<div>
<h2>Topics</h2>
<ul>
<li>
<Link to={`${match.url}/rendering`}>
Rendering with React
</Link>
</li>
<li>
<Link to={`${match.url}/components`}>
Components
</Link>
</li>
<li>
<Link to={`${match.url}/props-v-state`}>
Props v. State
</Link>
</li>
</ul>

<Route path={`${match.url}/:topicId`} component={Topic}/>
<Route exact path={match.url} render={() => (
<h3>Please select a topic.</h3>
)}/>
</div>
)

const Topic = ({ match }) => (
<div>
<h3>{match.params.topicId}</h3>
</div>
)


export default BasicExample

和之前相比,Router 标签里多了一个叫match 的东西。通过match来获取当前组件的路径。
也是通过match 来获取参数。
获取参数代码如下:

1
2
3
4
5
6

const Topic = ({ match }) => (
<div>
<h3>{match.params.topicId}</h3>
</div>
)

传入的时候以以下方式传入:

1
2
3
4
5
6
7
<Link to={`${match.url}/props-v-state`}>
Props v. State
</Link>
<Link to={`${match.url}/components`}>
Components
</Link>
<Route path={`${match.url}/:topicId`} component={Topic}/>

但是如果组件是通过Component 建立的,可以通过 this.props.match.params 获取参数。代码如下:

1
2
3
4
5
6
7
8
<div>
<div className="subject-tit">
{this.props.match.params.message}
<a href="#">(查看原因)</a>
</div>
<div className="img-box"></div>
<input type="button" value="返回首页"/>
</div>

关于数组遍历dom没有key导致的错误 react&npm 中的state

React 报错 Warning: Each child in an array or iterator should have a unique “key” prop.

这个是和react的dom-diff算法相关的。react对dom做遍历的时候,会根据data-reactid生成虚拟dom树。如果你没有手动的添加unique constant key的话,react是无法记录你的dom操作的。它只会在重新渲染的时候,继续使用相应dom数组的序数号(就是array[index]这种)来比对dom树。

解决办法:

1
2
3
4
5
6
7
8
bannerArr.map(function (src,index) {
// body...
return (
<div className="banner-box" key={index}>
<img src={src} />
</div>
)
})

在遍历的dom节点加个key属性

2. react&npm 中的this.state

1
2
3
4
5
6
7
8
constructor(props) {
super(props);
// this.onClickButton = this.onClickButton.bind(this);
this.state = {
left: 0,
curr:0
};
}

html代码

1
2
<span className="prev" onClick={this.prev.bind(this)}></span>
<span className="next" onClick={this.next.bind(this)}></span>